
| Lynn Williams | Mike Wood |
| John Theron | Chris Bobka |
| Dudley Pattison | Colin Cheese |
| Brian Anderson |
Hi all,
When I was a lazy model aircraft trade kit manufacturer and distributor I often put a 'Dud's tip' in the catalogue or kit instructions. I thought it may be useful to resurrect the practice within the Flitzer group, in fact if all Flitzer builders did tips we would hopefully all be better armed to tackle the Flitzer build.
This first offering is on the care of brushes. When you have several sessions of varnishing to do it is painful to do the proper thing by washing the brush in the appropriate thinner, and then washing in a high concentration of Fairy liquid or similar, squeezing the brush through twixt thumb and forefinger.
Better to drill a hole in the lid of a jar, pass the brush up through it, screw the lid onto the jar (after putting some thinners in of course) and apply a clothes peg to keep the brush just off the bottom. Own up, how many brushes have you ruined by allowing it to go out of shape by slumping down on the bottom of the jar?
Regards
Duds
The EAA offers a variety of construction tips for the following categories:
Regarding the notes on seats, G-Fliz was set up as per the dwgs, with 2 boards as support (covered with "cushioned foam"). Uncomfortable was an understatement. For those willing to make the effort, you might want to do as I did and make your own "conformal" seats.
As any ergonomicist (phew!) will tell you, it's not the cushioning that provides comfort, but the support in the right places. I've had 30 years of sitting on ejection seats with nothing more than a thin bit of sheepskin between my backside and pretty solid fibreglass, and no haemorroids yet. Get a large sheet of polystyrene foam, about 1 inch thick, cut it up into squares to match the seat base, stack them about 4 deep and sit on it on a hard floor (you may need to rest your back against something to get the correct rake, and raise your feet on a small block of wood). After a few minutes, the foam conforms to the pressure and leaves a "dent". Size of dent depends on how well you enjoy your food. Draw around the dent with a marker before it disappears, then cut the shape out of the top square. Replace this on the stack and repeat. As you work your way down the stack, the bit you cut out becomes progressively smaller and more "kidney shaped" but also requires bits cut out to allow your thighs to "sit" comfortably, and a "saddlehorn" appears between them. Once you've got down to a level where you aren't leaving any more dents, pin the whole lot together with some skewers and smooth off the internal contours with sandpaper. Keep trialling the fit as you go along - the ideal is to get the whole surface of your nether regions and upper thighs evenly supported.
Once you're happy, transfer the "slices" to some high-density foam, the stuff engineers use to line their tool trays is ideal, cut out carefully using a very sharp knife, attempting to transfer the contours of each slice faithfully. Glue the whole lot together, cover with a towel and sit in it until the glue dries! I did, and fell asleep. I woke up with a sore neck (was in the cockpit at the time) but no other complaints. You'll probably have to attack it with sandpaper to get a nice smooth contour, and the surface of the foam will scuff up. Get rid of this by heating the scuffing with a hot air gun (careful, now!) Resulting seat is supremely comfortable, very light. Did the same with the back rest, incorporating lumbar support and side supports. Rather more difficult to achieve but equally light, comfortable and effective.Will post a photo when I get the chance - sometime next year at this rate!
Mike Wood
Mike's method is a good one, just use Dynafoam sheets though, nothing else. Reason for this is it retards "G" forces up through the spine on impacts much better than any other foam, recommended by the PFA! Also, you can use a trick from the F1 racing world and get a dustbin liner, tape the end almost up, then fill with the liquid Dynafoam and sit in it, in your cockpit until it sets. If you do the same for the backrest you will end up with 2 perfectly formed (but expensive) Dynafoam seat molds, just cover in quality material and admire! Lynn's method is fine, I have tried his seat quite a few times now, it's simple and effective (Flitzer requirement).
Good luck all,
John [Theron] :)
It's a nifty little tool for accurately locating a hidden hole, e.g. under the edge of the aluminium sheet that you are trying to attach.
This variant is a scrap of SS strip that was lying around, bend over, drill a hole the right size, pop in a small pop rivet, tidy up the popped end, check that the hole still lines up, and voila! It must have taken at least 5 minutes to make this. Mark the hole position on aluminium overlay through the hole in the top. - Brian Anderson
 |
 |
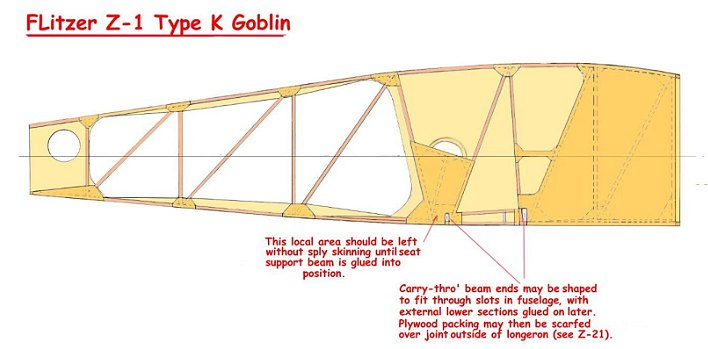
Don't forget, that with the lower wing ribs, you only need the slotted plywood webs in the rib structure (for the passage of the aileron control wires) as far as the pulley bay. Thereafter to the tips the ribs can conform to the simpler, and lighter, design of the upper ribs. I know this is obvious, but some Z-Types have been built with the slotted ribs all the way to the tip, due to the hypnotically automatic process by which ribs are often built!
Best regards,
Lynn
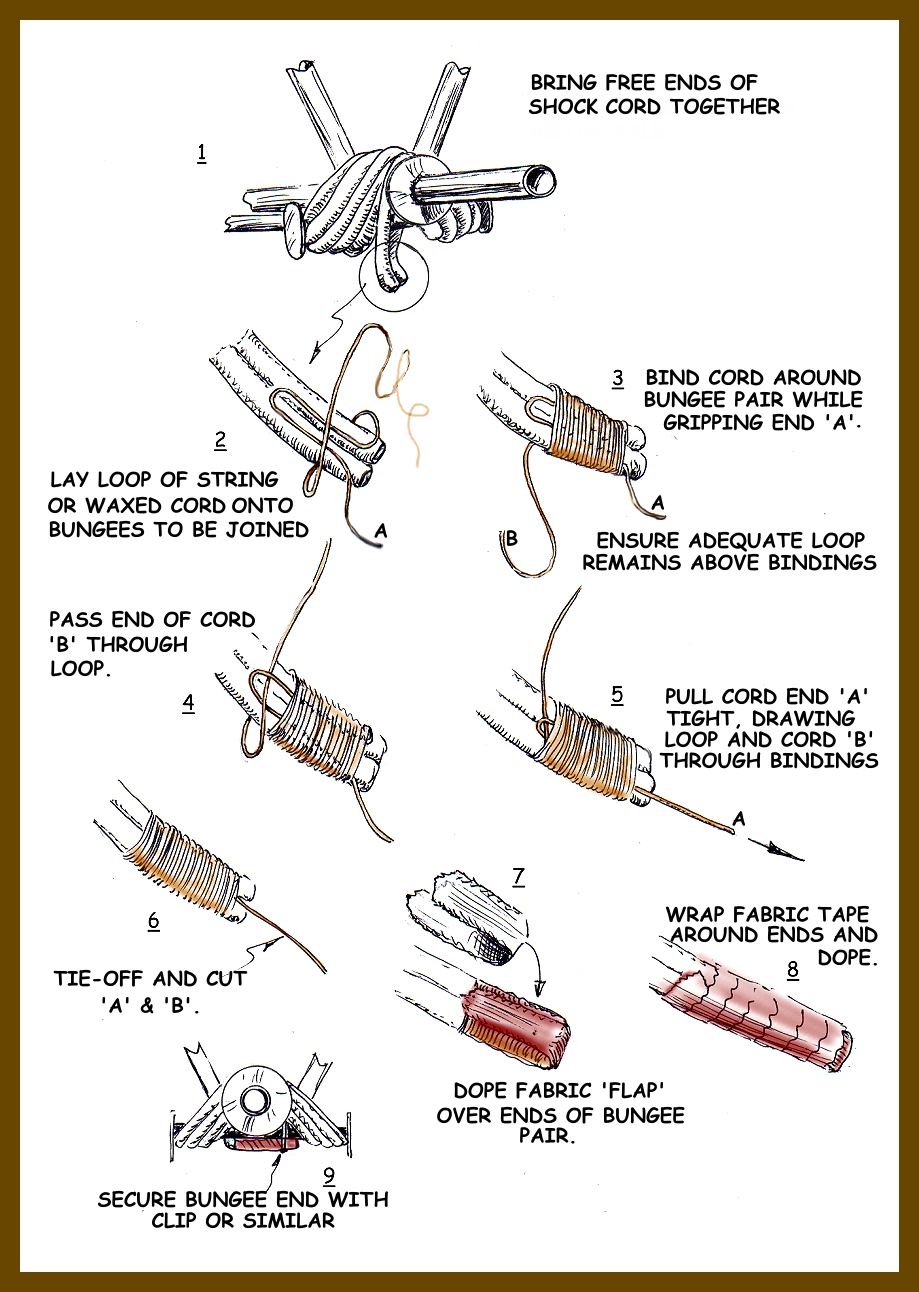
Question: A quick point on bungees. When I ordered mine from LAS I was asked if I wanted hard or soft. I never knew there were differing grades. I opted for the hard, which after receiving the stuff I fear may have been the wrong choice (and it was B expensive). If I can actually get them on with any tension in them they may be ideal, but as they are reluctant to move at all I wonder if I will be able to. My fading memory tells me that I could stretch the 1/2" Fury bungees relatively easily. Any thoughts? Also I intend to form the bungee end loops by binding with waxed rib lacing cord as I did on the Fury, but did I see one of your sketches covering this subject?
Duds
Answer: I remember how hard the hardest grade bungee was, but didn't use this on the Z-1. I suppose if it went on without stretching it would be a simple way of fitting it but I'd like to think that there's some pre-tension on the suspension. Having said that mine's not as tight as I'd like, due to my fitting it on my own and not being able to maintain enough tension when wrapping it, so I must do it again. Rupert used 5/8" bungee on G-ERIW which is very stiff.
Here's the sketch, but have a look at the way Saso and Janez wrapped theirs on the Slovenian Flitzer. It's a much better method than the 'conventional' pattern.
Lynn<
Hi all,
I have just finished doing the drag wires on my lower wings and have kept a photographic record of the process to hopefully save others some time. Please note that what I have used is 13swg (equivalent) which is not applicable to all Flitzers. The principles remain the the same however.
Regards,
Duds
Drag Wires
LeadingEdges.pdf
PlyingTheWing.pdf
A wooden one, not an Irish one!
Figuring out how to make the dimples on each of the aluminium covers under the cabane, to provide clearance over the cabane bolts has excerised my mind for some time. I made a wooden form to test the possibility of pressing, or hammering these dimples. Tried squeezing the form blocks in the vice, but I couldn't exert enough pressure. Tried hammering and didn't like the result. Tried putting the form blocks under the car jack and lifted the car. Still not enough pressure. Visited the local engineering shop and talked to the guys about using a press. Yes - - now we might be getting somewhere.
I made a wooden jig to hold everything in place and did a test using a scrap of 0.6mm 2024 aluminium. The result was not great but looked promising, and the jig needed some refinements. I improved the jig and ordered some commercial 0.6mm alumimium. This is 5025 H23, and is described as half hard. It is a deal softer than the 2024 and looked like it might draw much better.
Today was the big test on the real panels. The jig worked fine, and I think the results will be very acceptable. The 5025 works a lot better, and it is surprising how much the drawing process hardens up the material. The next step is to roll the panels to shape, and I have found someone at the local airport with the rollers to do it. Rolling ought to stiffen the panels too, so the plan is to roll cautiously back and forth if necessary to get the shape and the stiffness. If any little ripples remain then they can be gently hammered out.
The jig was carefully engineered to produce the correct depth of dimple. But, the second press was a little bit more severe, and the 3rd and 4th dimples were only marginally deep enough. I measured the plug and found that the 2nd press had compressed the plug, perhaps 1mm. Not surprising over a total depth of 40mm, and the fact that the plug is pine, with ply laminations on top.
The photos show the disassembled jig, the plug with the aluminium top plate which acts as a depth gauge, and the panels - - as pressed - - with no attempt yet to tidy up the result. I think these will be acceptable.
There are probably other ways of doing this, but perhaps this will also help other builders, who like me find the metalwork a bit of a challenge.
Brian Anderson
 |
 |
 |
 |
 |
Cutting List Round Tail Variants
Cutting List Square Tail Variants
Colin Cheese's Round Tail Cutting List - Jan 09, 2008
MIL-DTL-6070C-Specification.pdf - I figured out how to put more than one page into the same file so here is a 13 pager with the most current US Mil spec on aircraft plywood.
It used to be MIL-W-6070, with the W standing for, I think, you guessed it, wood. I don't know what the DTL means.
Note the box on the first page. It states that the Mil Spec expired in 1997 and plywood "designed" after 2/24/97 must meet the relevant Commercial spec, etc...
It did, in fact, expire...
Chris
GPS Installation - Photos and details of Lynn's tidy hand-held GPS installation. Folds away when not in use.
 | Notes from Ian Wasey on the Aerovee installation of Rupert Wasey's Z-21 Roundtail. |